0.00%
Search · Index

Weblog Page

Showing 101 - 110 of 230 Postings (summary)

Notifications

Created by Gustaf Neumann, last modified by Gustaf Neumann 17 Feb 2008, at 07:08 AM

by David Bell and Simon Carstensen

OpenACS docs are written by the named authors, and may be edited by OpenACS documentation staff.

The notifications package allows you to send notifications through any defined communications medium (e.g. email, sms) upon some event occuring within the system.

This tutorial steps through the process of integrating the notifications package with your package.

First step is to create the notification types. To do this a script similar to the one below needs to be loaded into Postgresql. I create this script in a package-name/sql/postgresql/package-name-notifications-init.sql file. I then load this file from my create sql file. The following code snippet is taken from Weblogger. It creates a lars_blogger_notif notification type (which was created above).

    create function inline_0() returns integer as '
    declare
            impl_id integer;
            v_foo   integer;
    begin
        -- the notification type impl
        impl_id := acs_sc_impl__new (
                      ''NotificationType'',
                      ''lars_blogger_notif_type'',
                      ''lars-blogger''
        );

        v_foo := acs_sc_impl_alias__new (
                    ''NotificationType'',
                    ''lars_blogger_notif_type'',
                    ''GetURL'',
                    ''lars_blogger::notification::get_url'',
                    ''TCL''
        );

        v_foo := acs_sc_impl_alias__new (
                    ''NotificationType'',
                    ''lars_blogger_notif_type'',
                    ''ProcessReply'',
                    ''lars_blogger::notification::process_reply'',
                    ''TCL''
        );

        PERFORM acs_sc_binding__new (
                    ''NotificationType'',
                    ''lars_blogger_notif_type''
        );

        v_foo:= notification_type__new (
	        NULL,
                impl_id,
                ''lars_blogger_notif'',
                ''Blog Notification'',
                ''Notifications for Blog'',
		now(),
                NULL,
                NULL,
		NULL
        );

        -- enable the various intervals and delivery methods
        insert into notification_types_intervals
        (type_id, interval_id)
        select v_foo, interval_id
        from notification_intervals where name in (''instant'',''hourly'',''daily'');

        insert into notification_types_del_methods
        (type_id, delivery_method_id)
        select v_foo, delivery_method_id
        from notification_delivery_methods where short_name in (''email'');

        return (0);
    end;
    ' language 'plpgsql';

    select inline_0();
    drop function inline_0();
    

You also need a drop script. This is untested for comptability with the above script.

      -- @author gwong@orchardlabs.com,ben@openforce.biz
      -- @creation-date 2002-05-16
      --
      -- This code is newly concocted by Ben, but with significant concepts and code
      -- lifted from Gilbert's UBB forums. Thanks Orchard Labs.
      -- Lars and Jade in turn lifted this from gwong and ben.

create function inline_0 ()
returns integer as '
declare
    row                             record;
begin
    for row in select nt.type_id
               from notification_types nt
               where nt.short_name in (''lars_blogger_notif_type'',''lars_blogger_notif'')
    loop
        perform notification_type__delete(row.type_id);
    end loop;

    return null;
end;' language 'plpgsql';

select inline_0();
drop function inline_0 ();

--
-- Service contract drop stuff was missing - Roberto Mello
--

create function inline_0() returns integer as '
declare
        impl_id integer;
        v_foo   integer;
begin

        -- the notification type impl
        impl_id := acs_sc_impl__get_id (
                      ''NotificationType'',		-- impl_contract_name
                      ''lars_blogger_notif_type''	-- impl_name
        );

        PERFORM acs_sc_binding__delete (
                    ''NotificationType'',
                    ''lars_blogger_notif_type''
        );

        v_foo := acs_sc_impl_alias__delete (
                    ''NotificationType'',		-- impl_contract_name	
                    ''lars_blogger_notif_type'',	-- impl_name
                    ''GetURL''				-- impl_operation_name
        );

        v_foo := acs_sc_impl_alias__delete (
                    ''NotificationType'',		-- impl_contract_name	
                    ''lars_blogger_notif_type'',	-- impl_name
                    ''ProcessReply''			-- impl_operation_name
        );

	select into v_foo type_id
	  from notification_types
	 where sc_impl_id = impl_id
	  and short_name = ''lars_blogger_notif'';

	perform notification_type__delete (v_foo);

	delete from notification_types_intervals
	 where type_id = v_foo
	   and interval_id in (
		select interval_id
		  from notification_intervals
		 where name in (''instant'',''hourly'',''daily'')
	);

	delete from notification_types_del_methods
	 where type_id = v_foo
	   and delivery_method_id in (
		select delivery_method_id
		  from notification_delivery_methods
		 where short_name in (''email'')
	);

	return (0);
end;
' language 'plpgsql';

select inline_0();
drop function inline_0();
    

The next step is to setup our notification creation. A new notification must be added to the notification table for each blog entry added. We do this using the notification::new procedure

        notification::new  -type_id [notification::type::get_type_id  -short_name lars_blogger_notif]  -object_id $blog(package_id)  -response_id $blog(entry_id)  -notif_subject $blog(title)  -notif_text $new_content
    

This code is placed in the tcl procedure that creates blog entries, right after the entry gets created in the code. The $blog(package_id) is the OpenACS object_id of the Weblogger instance to which the entry has been posted to and the $new_content is the content of the entry. This example uses the package_id for the object_id, which results in setting up notifications for all changes for blogger entries in this package. However, if you instead used the blog_entry_id or something like that, you could set up per-item notifications. The forums packages does this -- you can look at it for an example.

The final step is to setup the notification subscription process. In this example we want to let a user find out when a new entry has been posted to the blog. To do this we put a link on the blog that allows them to subscribe to notifications of new entries. The notifications/requests-new page is very handy in this situation.

Such a link can be created using the notification::display::request_widget proc:

    set notification_chunk [notification::display::request_widget  -type lars_blogger_notif  -object_id $package_id  -pretty_name [lars_blog_name]  -url [lars_blog_public_package_url]  ]
    

which will return something like

    You may <a href="/notifications/request-new?...">request notification</a> for Weblogger.

which can be readily put on the blog index page. The pretty_name parameter is what appears at the end of the text returned (i.e. "... request notification</a> for pretty_name"), The url parameter should be set to the address we want the user to be redirected to after they have finished the subscription process.

This should be all you need to implement a notification system. For more examples look at the forums package.

Security Requirements

Created by Gustaf Neumann, last modified by Gustaf Neumann 17 Feb 2008, at 07:08 AM

By Richard Li

OpenACS docs are written by the named authors, and may be edited by OpenACS documentation staff.

This document lists the requirements for the security system for the OpenACS.

Virtually all web sites support personalized content based on user identity. The level of personalization may be as simple as displaying the name of the user on certain pages or can be as sophisticated as dynamically recommending sections of site that the user may be interested in based on prior browsing history. In any case, the user's identity must be validated and made available to the rest of the system. In addition, sites such as ecommerce vendors require that the user identity be securely validated.

The security system consists of a number of subsystems.

Signed Cookies

Cookies play a key role in storing user information. However, since they are stored in plaintext on a user's system, the validity of cookies is an important issue in trusting cookie information. Thus, we want to be able to validate a cookie, but we also want to validate the cookie without a database hit.

  • 10.0 Guaranteed Tamper Detection Any tampering of cookie data should be easily detectable by the web server.

  • 10.1 Performance and Scalability Validation and verification of the cookie should be easily scalable and should not require a database query on every hit.

Session Properties

Applications should be able to store session-level properties in a database table.

  • 11.0 Storage API Session-level data should be accessible via an API.

  • 11.1 Purge Mechanism An efficient pruning mechanism should be used to prevent old session level properties from filling up the table.

Login

The security system should support the concept of persistent user logins. This persistence takes several forms.

  • 12.0 Permanent Login Users should be able to maintain a permanent user login so that they never need to type their password.

  • 12.1 Session Login The security system should support the concept of a session, with authentication tokens that become invalid after a certain period of time.

  • 12.2 Session Definition A session is a sequence of clicks by one user from one browser in which no two clicks are separated by more than some constant (the session timeout).

  • 12.3 Stateless The security system should not require state that is stored in the server. Required state may reside only in the user request (including cookies), and in the database. A single user should be able to log in to the system even if the user is sent to a different AOLserver for each step of the login process (e.g., by a load balancer).

  • 12.4 Secure The security system should not store passwords in clear text in the database.

  • 13.0 SSL Hardware The system must work when the SSL processing occurs outside of the web server (in specialized hardware, in a firewall, etc.).

Adding in parameters for your package

Created by Gustaf Neumann, last modified by Gustaf Neumann 17 Feb 2008, at 07:08 AM

Each instance of a package can have paramaters associated with it. These are like preferences, and they can be set by the administrator for each application to change the behavior of your application.

To add parameters for your package, go to the Automatic Package Manager (/acs-admin/apm)

Click on your package

Under the Manage section, click on Parameters

It's fairly self-explanatory at this point. Create the parameters you want, and then access them in your code using the parameter::get procedure.

Install Full Text Search using Tsearch2

Created by Gustaf Neumann, last modified by Gustaf Neumann 17 Feb 2008, at 07:08 AM

By Dave Bauer, Joel Aufrecht and Malte Sussdorff with help from Tsearch V2 Introduction by Andrew J. Kopciuch

OpenACS docs are written by the named authors, and may be edited by OpenACS documentation staff.

If you want full text search, and you are running PostgreSQL, install this module to support FTS. Do this step after you have installed both PostgreSQL and AOLserver. You will need the tseach2 module form PostgreSQL contrib. This is included with the PostgreSQL full source distribution. It is also available with the PostgreSQL contrib package provided by most distribution packages. On debian it is called postgresql-contrib.

  1. For PostgreSQL 7.3 or 7.4, download the http://www.sai.msu.su/~megera/postgres/gist/tsearch/V2/regprocedure_7.4.patch.gz tsearch2 patch to correctly restore from a pg_dump backup. If you installed tsearch2 from a package, you can use the http://www.sai.msu.su/~megera/postgres/gist/tsearch/V2/regprocedure_update.sql regprocedure script to update the database after tsearch2 is installed into it. TODO link to section decribing how to fix an existing tsearch2 database with this patch.

  2. As of May 9, 2004 there is a source patch available for tsearch2. The patch provides changes to the pg_ts_ configuration tables to allow for easy dump and restore of a database containing tsearch2. The patch is available here : [http://www.sai.msu.su/~megera/postgres/gist/tsearch/V2/regprocedure_7.4.patch.gz]

    To apply this patch, download the mentioned file and place it in your postgreSQL source tree ($PGSQL_SRC). This patch makes the backup and restore procedures very simple.

                [postgres pgsql]$ cd /tmp
                [postgres tmp]$ wget http://www.sai.msu.su/~megera/postgres/gist/tsearch/V2/regprocedure_7.4.patch.gz
                [postgres pgsql]$ cd /usr/local/src/postgresql-7.4.5/
                [postgres postgresql-7.4.5] gunzip /tmp/regprocedure_7.4.patch.gz
                [postgres postgresql-7.4.5] patch -b -p1 < regprocedure_7.4.patch
    

    If you have a working version of tsearch2 in your database, you do not need to re-install the tsearch2 module. Just apply the patch and run make. This patch only affects the tsearch2.sql file. You can run the SQL script found : [right here] This script will make the modifications found in the patch, and update the fields from the existing data. From this point on, you can dump and restore the database in a normal fashion. Without this patch, you must follow the instructions later in this document for backup and restore.

    This patch is only needed for tsearch2 in PostgreSQL versions 7.3.x and 7.4.x. The patch has been applied to the sources for 8.0.

  3. Install Tsearch2. This is a PostgreSQL module that the tsearch2-driver OpenACS package requires. These instructions assume you are using the latest point release of PostgreSQL 7.4.5.

    [root root]# su - postgres
    [postgres pgsql]$ cd /usr/local/src/postgresql-7.4.5/contrib/tsearch2/
    [postgres tsearch2]$ make
    [postgres tsearch2]$ make install
    mkdir /usr/local/pgsql/share/contrib
    mkdir /usr/local/pgsql/doc/contrib
    (2 lines omitted)
    /bin/sh ../../config/install-sh -c -m 755 libtsearch.so.0.0 /usr/local/pgsql/lib/tsearch.so
    [postgres tsearch]$ exit
    logout
    
    [root root]#
    su - postgres
    cd /usr/local/src/postgresql-7.4.5/contrib/tsearch2
    make
    make install
    exit
    
  1. Click Admin on the top of the default home page. If prompted, log in with the account and password you entered during install.

  2. Click on the Install software link.

  3. Click on the Install new service link.

  4. Click on the Install link next to Tsearch2 Driver. If you have installed tsearch2 into your PostgreSQL database, the installer will automatically enable tsearch in your OpenACS database instance.

  5. Restart the service.

    [$OPENACS_SERVICE_NAME $OPENACS_SERVICE_NAME]$ svc -t /service/$OPENACS_SERVICE_NAME
    
    [$OPENACS_SERVICE_NAME $OPENACS_SERVICE_NAME]$
  6. Wait a minute, then browse back to the home page.

  7. Click on Admin on the top of the screen.

  8. Click on Main Site Administration in the "Subsite Administration" section.

  9. Click on Site Map in the "Advanced Features" section.

  10. Mount the Search interface in the site map.

    1. Click the new sub folder link on the Main Site line.

    2. Type search and click New.

    3. Click the new application link on the search line.

    4. Type search where it says untitled, choose search from the drop-down list, and click New.

    5. Click the Parameters link next to the Search package istance.

    6. Type tsearch2-driver where it says openfts-driver in the FtsEngineDriver parameter.

  11. Restart the service.

    [$OPENACS_SERVICE_NAME $OPENACS_SERVICE_NAME]$ svc -t /service/$OPENACS_SERVICE_NAME
    
    [$OPENACS_SERVICE_NAME $OPENACS_SERVICE_NAME]$
  12. Wait a minute, then click on Main Site at the top of the page.

Enabling Full Text Search in packages at the moment is not trivial. It involves a couple of steps, which I will illustrate taking lars-blogger as an example package

  1. Install the package.

    1. Click Admin on the top of the default home page. If prompted, log in with the account and password you entered during install.

    2. Click on the Install software link.

    3. Click on the Install new application link.

    4. Click on the Install link next to Weblogger.

    5. Install all required packages as well (always say okay until you shall restart the server)

  2. Load the service contracts datamodell and enable the service contract

    [$OPENACS_SERVICE_NAME $OPENACS_SERVICE_NAME]$ cd packages/lars-blogger/sql/postgresql
    [$OPENACS_SERVICE_NAME postgresql]$ psql $OPENACS_SERVICE_NAME -f lars-blogger-sc-create.sql

    Note: Usually this script is called package_name-sc-create.sql

  3. Restart the service.

    [$OPENACS_SERVICE_NAME postgresql]$ svc -t /service/$OPENACS_SERVICE_NAME
    
                    [$OPENACS_SERVICE_NAME postgresl]$

If you are lucky, Full Text Search is enabled now, if not consult http://openacs.org/forums/message-view?message_id=154759. This link also contains some hints on how to make sure it is enabled.

Unpack the OpenACS tarball

Created by Gustaf Neumann, last modified by Gustaf Neumann 17 Feb 2008, at 07:08 AM

The OpenACS tarball contains sample configuration files for some of the packages listed below. In order to access those files, unpack the tarball now.

[root root]# cd /tmp
[root tmp]# tar xzf openacs-5.2.3rc1.tgzcd /tmp
tar xzf openacs-5.2.3rc1.tgz

If you are installing from a different method and just need the configuration files, you can instead get them from CVS:

[root root]# cd /tmp
[root tmp]# cvs -d :pserver:anonymous@cvs.openacs.org:/cvsroot co openacs-4/packages/acs-core-docs/www/files/
cvs checkout: warning: failed to open /root/.cvspass for reading: No such file or directory
cvs server: Updating openacs-4/packages/acs-core-docs/www/files
U openacs-4/packages/acs-core-docs/www/files/README.TXT
(many lines omitted)
U openacs-4/packages/acs-core-docs/www/files/template-ini.ini
U openacs-4/packages/acs-core-docs/www/files/winnsd.txt
[root tmp]# mv openacs-4 openacs-5.2.3rc1cd /tmp
cvs -d :pserver:anonymous@cvs.openacs.org:/cvsroot co openacs-4/packages/acs-core-docs/www/files/
mv openacs-4 openacs-5.0.0a4

Overview

Created by Gustaf Neumann, last modified by Gustaf Neumann 17 Feb 2008, at 07:08 AM

Starting with Version 4.5, all OpenACS core packages support automatic upgrade. That means that, if you have OpenACS 4.5 or better, you should always be able to upgrade all of your core packages automatically. If you haven't changed anything, no manual intervention should be required. If you are running OpenACS prior to 4.5, upgrading will require manual effort.

If all of these conditions are true:

  • Your OpenACS Core is 5.0.0 or later

  • You do not keep your OpenACS site in a local CVS repository

  • You do not have any custom code

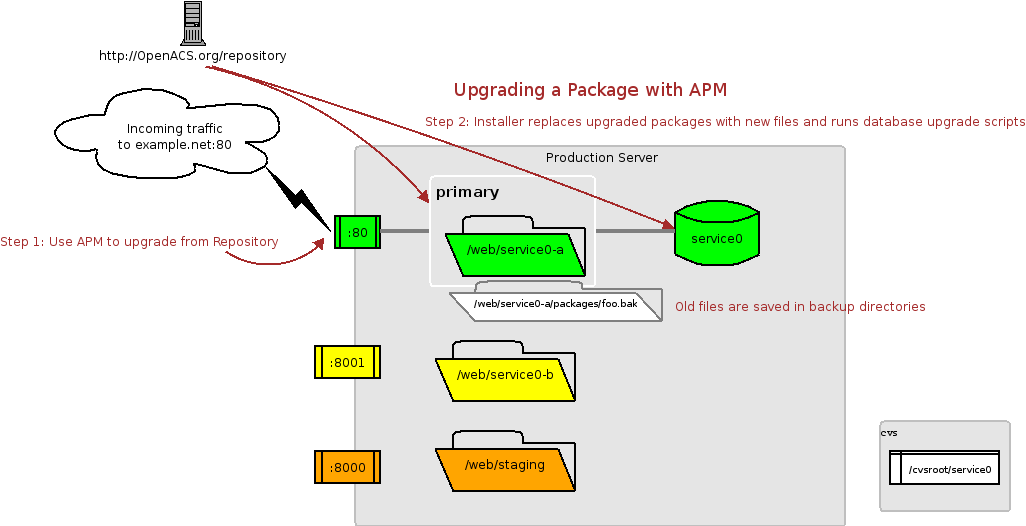
then you can upgrade automatically using the automated installer in the OpenACS Package Manager (APM), and you can probably skip the rest of this chapter. To upgrade directly from the OpenACS repository using the APM:

  1. Browse to the Installer.

  2. Click install or upgrade under "Install from OpenACS Repository" and select the packages to install or upgrade.

  3. The APM will download the requested packages from OpenACS.org, install the files on your hard drive, run any appropriate database upgrade scripts, and prompt you to restart the server. After restarting the server again, the upgrade is complete.

Figure5.1.Upgrading with the APM

Upgrading with the APM

It's always a good idea to precede an upgrade attempt with a snapshot backup.

Table5.1.Assumptions in this section

name of OpenACS user $OPENACS_SERVICE_NAME
OpenACS server name $OPENACS_SERVICE_NAME
Root of OpenACS file tree /var/lib/aolserver/$OPENACS_SERVICE_NAME
Database backup directory /var/lib/aolserver/$OPENACS_SERVICE_NAME/database-backup

Starting and Stopping an OpenACS instance.

Created by Gustaf Neumann, last modified by Gustaf Neumann 17 Feb 2008, at 07:08 AM

The simplest way to start and stop and OpenACS site is to run the startup shell script provided, /var/lib/aolserver/$OPENACS_SERVICE_NAME/etc/daemontools/run. This runs as a regular task, and logs to the logfile. To stop the site, kill the script.

A more stable way to run OpenACS is with a "keepalive" mechanism of some sort, so that whenever the server halts or is stopped for a reset, it restarts automatically. This is recommended for development and production servers.

The Reference Platform uses Daemontools to control AOLserver. A simpler method, using init, is here.

  1. Daemontools must already be installed. If not, install it.

  2. Each service controlled by daemontools must have a directory in /service. That directory must have a file called run. It works like this:

    • The init program starts every time the computer is booted.

    • A line in init's configuration file, /etc/inittab, tells init to run, and to restart if necessary, svscanboot.

    • svscanboot checks the directory /service every few seconds.

    • If it sees a subdirectory there, it looks for a file in the subdirectory called run. If it finds a run file, it creates a supervise process

    • supervise executes the run script. Whenever the run script stops, supervise executes it again. It also creates additional control files in the same directory.

    Hence, the AOLserver instance for your development server is started by the file /service/$OPENACS_SERVICE_NAME/run. But we use a symlink to make it easier to add and remove stuff from the /service, so the actual location is /var/lib/aolserver/$OPENACS_SERVICE_NAMEetc/daemontools/run.

    Daemontools creates additional files and directories to track status and log. A daemontools directory is included in the OpenACS tarball at /var/lib/aolserver/$OPENACS_SERVICE_NAME/etc/daemontools. To use it, first ill any existing AOLserver instances. As root, link the daemontools directory into the /service directory. Daemontools' svscan process checks this directory every five seconds, and will quickly execute run.

    [$OPENACS_SERVICE_NAME etc]$ killall nsd
    nsd: no process killed
    [$OPENACS_SERVICE_NAME etc]$ emacs /var/lib/aolserver/$OPENACS_SERVICE_NAME/etc/daemontools/run
    [$OPENACS_SERVICE_NAME etc]$ exit
    
    [root root]# ln -s /var/lib/aolserver/$OPENACS_SERVICE_NAME/etc/daemontools/ /service/$OPENACS_SERVICE_NAME


    Verify that AOLserver is running.

    [root root]# ps -auxw | grep nsd$OPENACS_SERVICE_NAME   5562 14.4  6.2 22436 15952 ?       S    11:55   0:04 /usr/local/aolserver/bin/nsd -it /var/lib/aolserver/$OPENACS_SERVICE_NAME/etc/config.tcl -u serve
    root      5582  0.0  0.2  3276  628 pts/0    S    11:55   0:00 grep nsd
    [root root]#
  3. The user $OPENACS_SERVICE_NAME can now control the service $OPENACS_SERVICE_NAME with these commands:

    • svc -d /service/$OPENACS_SERVICE_NAME - Bring the server down

    • svc -u /service/$OPENACS_SERVICE_NAME - Start the server up and leave it in keepalive mode.

    • svc -o /service/$OPENACS_SERVICE_NAME - Start the server up once. Do not restart it if it stops.

    • svc -t /service/$OPENACS_SERVICE_NAME - Stop and immediately restart the server.

    • svc -k /service/$OPENACS_SERVICE_NAME - Sends the server a KILL signal. This is like KILL -9. AOLserver exits immediately. If svc -t fails to fully kill AOLserver, use this option. This does not take the server out of keepalive mode, so it should still bounce back up immediately.

  4. Install a script to automate the stopping and starting of AOLserver services via daemontools. You can then restart a service via restart-aolserver $OPENACS_SERVICE_NAME

    [root root]# cp /var/lib/aolserver/$OPENACS_SERVICE_NAME/packages/acs-core-docs/www/files/restart-aolserver-daemontools.txt /usr/local/bin/restart-aolserver
    [root root]# chmod 755 /usr/local/bin/restart-aolserver
    [root root]#
  5. At this point, these commands will work only for the root user. Grant permission for the web group to use svc commands on the $OPENACS_SERVICE_NAME server.

    [root root]# /usr/local/bin/svgroup web /service/$OPENACS_SERVICE_NAME
    
    [root root]#
  6. Verify that the controls work. You may want to tail -f /var/lib/aolserver/$OPENACS_SERVICE_NAME/log/$OPENACS_SERVICE_NAME-error.log in another window, so you can see what happens when you type these commands.

    Most of this information comes from Tom Jackson's AOLserver+Daemontools Mini-HOWTO.

Table6.1.How it Works

Program Invoked by this program ... ... using this file Where to find errors Log goes to Use these commands to control it
svscanboot init /etc/inittab ps -auxw | grep readproctitle n/a
aolserver supervise (a child of svscanboot) /service/$OPENACS_SERVICE_NAME/run /var/lib/aolserver/$OPENACS_SERVICE_NAME/log/error.log /var/lib/aolserver/$OPENACS_SERVICE_NAME/log/$OPENACS_SERVICE_NAME.log svc -k /service/$OPENACS_SERVICE_NAME
postgresql Redhat init scripts during boot /etc/init.d/postgresql /usr/local/pgsql/data/server.log service postgresql start (Red Hat), /etc/init.d/postgresql start (Debian)

Security Information

Created by Gustaf Neumann, last modified by Gustaf Neumann 17 Feb 2008, at 07:08 AM

Once you get your OS installed, it's imperative that you secure your installation. As Jon Griffin repeatedly warns us, "No distribution is secure out of the box." The Reference Platform implements some basic precautions, but security is a process, not a condition. If you are responsible for a computer hooked to the internet, you are responsible for learning some rudiments of security, such as monitoring the state of a computer, maintaining patch levels, and keeping backups. We recommend these resources:

Design Notes

Created by Gustaf Neumann, last modified by Gustaf Neumann 17 Feb 2008, at 07:08 AM

User locale is a property of ad_conn, ad_conn locale. The request processor sets this by calling lang::conn::locale, which looks for the following in order of precedence:

  1. Use user preference for this package (stored in ad_locale_user_prefs)

  2. Use system preference for the package (stored in apm_packages)

  3. Use user's general preference (stored in user_preferences)

  4. Use Browser header (Accept-Language HTTP header)

  5. Use system locale (an APM parameter for acs_lang)

  6. default to en_US

For ADP pages, message key lookup occurs in the templating engine. For TCL pages, message key lookup happens with the _ function. In both cases, if the requested locale is not found but a locale which is the default for the language which matches your locale's language is found, then that locale is offered instead.

Overview

Created by Gustaf Neumann, last modified by Gustaf Neumann 17 Feb 2008, at 07:08 AM

  • The OpenACS Kernel, which handles system-wide necessities such as metadata, security, users and groups, subsites, and package management and deployment.

  • The OpenACS Core, which comprises all the other packages that ship with the kernel and are most frequently needed by users, such as templating, forums, and user registration/management. The packages tend to be developed and distributed with the kernel.

  • OpenACS Application packages, which typically provide user-level web services built on top of the Kernel and Core. Application packages are developed separately from the Kernel, and are typically released independently of it.

This document provides a high level overview of the kernel package. Documentation for other packages on this server

Next Page