
- I OpenACS For Everyone
- I.1 High level information: What is OpenACS?
- I.1.1 Overview
- I.1.2 OpenACS Release Notes
- I.2 OpenACS: robust web development framework
- I.2.1 Introduction
- I.2.2 Basic infrastructure
- I.2.3 Advanced infrastructure
- I.2.4 Domain level tools
- I.1 High level information: What is OpenACS?
- II Administrator's Guide
- II.2 Installation Overview
- II.2.1 Basic Steps
- II.2.2 Prerequisite Software
- II.3 Complete Installation
- II.3.1 Install a Unix-like system and supporting software
- II.3.2 Install Oracle 10g XE on debian
- II.3.2.1 Install Oracle 8.1.7
- II.3.3 Install PostgreSQL
- II.3.4 Install AOLserver 4
- II.3.5 Quick Install of OpenACS
- II.3.5.1 Complex Install OpenACS 5.3
- II.3.6 OpenACS Installation Guide for Windows2000
- II.3.7 OpenACS Installation Guide for Mac OS X
- II.4 Configuring a new OpenACS Site
- II.4.1 Installing OpenACS packages
- II.4.2 Mounting OpenACS packages
- II.4.3 Configuring an OpenACS package
- II.4.4 Setting Permissions on an OpenACS package
- II.4.5 How Do I?
- II.4.6 Configure OpenACS look and feel with templates
- II.5 Upgrading
- II.5.1 Overview
- II.5.2 Upgrading 4.5 or higher to 4.6.3
- II.5.3 Upgrading OpenACS 4.6.3 to 5.0
- II.5.4 Upgrading an OpenACS 5.0.0 or greater installation
- II.5.5 Upgrading the OpenACS files
- II.5.6 Upgrading Platform components
- II.6 Production Environments
- II.6.1 Starting and Stopping an OpenACS instance.
- II.6.2 AOLserver keepalive with inittab
- II.6.3 Running multiple services on one machine
- II.6.4 High Availability/High Performance Configurations
- II.6.5 Staged Deployment for Production Networks
- II.6.6 Installing SSL Support for an OpenACS service
- II.6.7 Set up Log Analysis Reports
- II.6.8 External uptime validation
- II.6.9 Diagnosing Performance Problems
- II.7 Database Management
- II.7.1 Running a PostgreSQL database on another server
- II.7.2 Deleting a tablespace
- II.7.3 Vacuum Postgres nightly
- II.8 Backup and Recovery
- II.8.1 Backup Strategy
- II.8.2 Manual backup and recovery
- II.8.3 Automated Backup
- II.8.4 Using CVS for backup-recovery
- II.A Install Red Hat 8/9
- II.B Install additional supporting software
- II.B.1 Unpack the OpenACS tarball
- II.B.2 Initialize CVS (OPTIONAL)
- II.B.3 Add PSGML commands to emacs init file (OPTIONAL)
- II.B.4 Install Daemontools (OPTIONAL)
- II.B.5 Install qmail (OPTIONAL)
- II.B.6 Install Analog web file analyzer
- II.B.7 Install nspam
- II.B.8 Install Full Text Search
- II.B.9 Install Full Text Search using Tsearch2
- II.B.10 Install Full Text Search using OpenFTS (deprecated see tsearch2)
- II.B.11 Install nsopenssl
- II.B.12 Install tclwebtest.
- II.B.13 Install PHP for use in AOLserver
- II.B.14 Install Squirrelmail for use as a webmail system for OpenACS
- II.B.15 Install PAM Radius for use as external authentication
- II.B.16 Install LDAP for use as external authentication
- II.B.17 Install AOLserver 3.3oacs1
- II.C Credits
- II.C.1 Where did this document come from?
- II.C.2 Linux Install Guides
- II.C.3 Security Information
- II.C.4 Resources
- II.2 Installation Overview
- III For OpenACS Package Developers
- III.9 Development Tutorial
- III.9.1 Creating an Application Package
- III.9.2 Setting Up Database Objects
- III.9.3 Creating Web Pages
- III.9.4 Debugging and Automated Testing
- III.10 Advanced Topics
- III.10.1 Write the Requirements and Design Specs
- III.10.2 Add the new package to CVS
- III.10.3 OpenACS Edit This Page Templates
- III.10.4 Adding Comments
- III.10.5 Admin Pages
- III.10.6 Categories
- III.10.7 Profile your code
- III.10.8 Prepare the package for distribution.
- III.10.9 Distributing upgrades of your package
- III.10.10 Notifications
- III.10.11 Hierarchical data
- III.10.12 Using .vuh files for pretty urls
- III.10.13 Laying out a page with CSS instead of tables
- III.10.14 Sending HTML email from your application
- III.10.15 Basic Caching
- III.10.16 Scheduled Procedures
- III.10.17 Enabling WYSIWYG
- III.10.18 Adding in parameters for your package
- III.10.19 Writing upgrade scripts
- III.10.20 Connect to a second database
- III.10.21 Future Topics
- III.11 Development Reference
- III.11.1 OpenACS Packages
- III.11.2 OpenACS Data Models and the Object System
- III.11.3 The Request Processor
- III.11.4 The OpenACS Database Access API
- III.11.5 Using Templates in OpenACS
- III.11.6 Groups, Context, Permissions
- III.11.7 Writing OpenACS Application Pages
- III.11.8 Parties in OpenACS
- III.11.9 OpenACS Permissions Tediously Explained
- III.11.10 Object Identity
- III.11.11 Programming with AOLserver
- III.11.12 Using Form Builder: building html forms dynamically
- III.12 Engineering Standards
- III.12.1 OpenACS Style Guide
- III.12.2 Release Version Numbering
- III.12.3 Constraint naming standard
- III.12.4 ACS File Naming and Formatting Standards
- III.12.5 PL/SQL Standards
- III.12.6 Variables
- III.12.7 Automated Testing
- III.13 CVS Guidelines
- III.13.1 Using CVS with OpenACS
- III.13.2 OpenACS CVS Concepts
- III.13.3 Contributing code back to OpenACS
- III.13.4 Additional Resources for CVS
- III.14 Documentation Standards
- III.14.1 OpenACS Documentation Guide
- III.14.2 Using PSGML mode in Emacs
- III.14.3 Using nXML mode in Emacs
- III.14.4 Detailed Design Documentation Template
- III.14.5 System/Application Requirements Template
- III.15 TCLWebtest
- III.16 Internationalization
- III.16.1 Internationalization and Localization Overview
- III.16.2 How Internationalization/Localization works in OpenACS
- III.16.4 Design Notes
- III.16.5 Translator's Guide
- III.D Using CVS with an OpenACS Site
- III.9 Development Tutorial
- IV For OpenACS Platform Developers
- IV.17 Kernel Documentation
- IV.17.1 Overview
- IV.17.2 Object Model Requirements
- IV.17.3 Object Model Design
- IV.17.4 Permissions Requirements
- IV.17.5 Permissions Design
- IV.17.6 Groups Requirements
- IV.17.7 Groups Design
- IV.17.8 Subsites Requirements
- IV.17.9 Subsites Design Document
- IV.17.10 Package Manager Requirements
- IV.17.11 Package Manager Design
- IV.17.12 Database Access API
- IV.17.13 OpenACS Internationalization Requirements
- IV.17.14 Security Requirements
- IV.17.15 Security Design
- IV.17.16 Security Notes
- IV.17.17 Request Processor Requirements
- IV.17.18 Request Processor Design
- IV.17.19 Documenting Tcl Files: Page Contracts and Libraries
- IV.17.20 Bootstrapping OpenACS
- IV.17.21 External Authentication Requirements
- IV.18 Releasing OpenACS
- IV.18.1 OpenACS Core and .LRN
- IV.18.2 How to Update the OpenACS.org repository
- IV.18.3 How to package and release an OpenACS Package
- IV.18.4 How to Update the translations
- IV.17 Kernel Documentation
- V Tcl for Web Nerds
- V.1 Tcl for Web Nerds Introduction
- V.2 Basic String Operations
- V.3 List Operations
- V.4 Pattern matching
- V.5 Array Operations
- V.6 Numbers
- V.7 Control Structure
- V.8 Scope, Upvar and Uplevel
- V.9 File Operations
- V.10 Eval
- V.11 Exec
- V.12 Tcl for Web Use
- V.13 OpenACS conventions for TCL
- V.14 Solutions
- VI SQL for Web Nerds
- VI.1 SQL Tutorial
- VI.1.1 SQL Tutorial
- VI.1.2 Answers
- VI.2 SQL for Web Nerds Introduction
- VI.3 Data modeling
- VI.3.1 The Discussion Forum -- philg's personal odyssey
- VI.3.2 Data Types (Oracle)
- VI.3.4 Tables
- VI.3.5 Constraints
- VI.4 Simple queries
- VI.5 More complex queries
- VI.6 Transactions
- VI.7 Triggers
- VI.8 Views
- VI.9 Style
- VI.10 Escaping to the procedural world
- VI.11 Trees
- VI.1 SQL Tutorial
II.5.5 Upgrading the OpenACS files
OpenACS is distributed in many different ways:
-
as a collection of files
-
as one big tarball
-
via CVS
-
via automatic download from within the APM (package manager)
Upgrades work by first changing the file system (via any of the previous methods), and then using the APM to scan the file system, find upgrade scripts, and execute them. Starting with OpenACS 5.0, the last method was added, which automatically changes the file system for you. If you are using the last method, you can skip this page. This page describes whether or not you need to be upgrading using this page or not: the section called âUpgrading an OpenACS 5.0.0 or greater installationâ
-
Upgrading files for a site which is not in a CVS repository.Unpack the tarball into a new directory and copy its contents on top of your working directory. Or just 'install software', select remote repository, and upgrade your files from there.
[root root]#
su - $OPENACS_SERVICE_NAME[$OPENACS_SERVICE_NAME aolserver]$cd /var/lib/aolserver[$OPENACS_SERVICE_NAME web]$tar xzf /var/tmp/openacs-5-1.tar.gz[$OPENACS_SERVICE_NAME web]$cp -r openacs-5-1/* openacs-4[$OPENACS_SERVICE_NAME openacs-upgrade]$exit[root root]# su - $OPENACS_SERVICE_NAME cd /var/lib/aolserver tar xzf /var/tmp/openacs-5-1.tgz cp -r openacs-5-1/* openacs-4 exit -
Upgrading files for a site in a private CVS repository
Many OpenACS site developers operate their own CVS repository to keep track of local customizations. In this section, we describe how to upgrade your local CVS repository with the latest OpenACS version, without overriding your own local customizations.
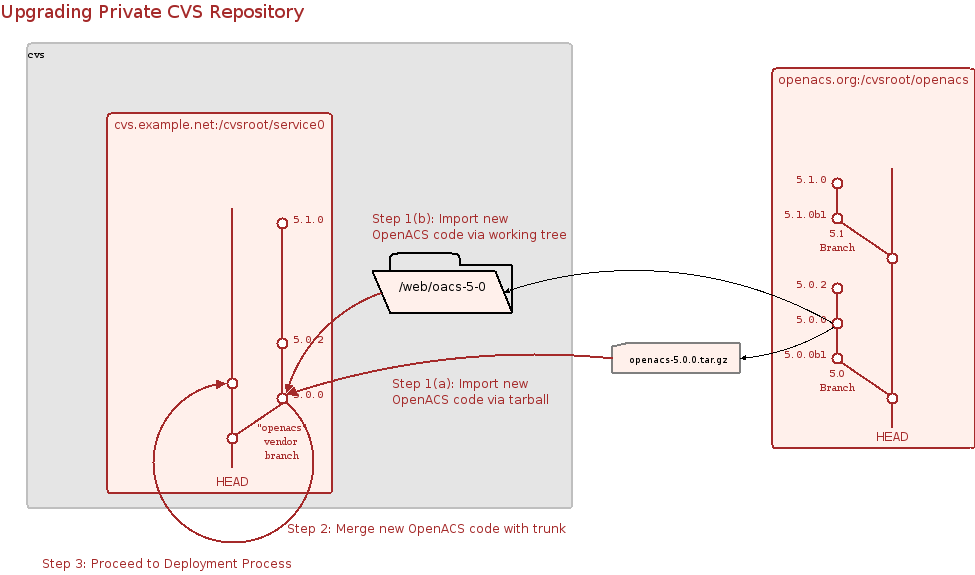
This diagram explains the basic idea. However, the labels are incorrect. Step 1(a) has been removed, and Step 1(b) should be labelled Step 1.
-
Step 0: Set up a working CVS checkout.To get your OpenACS code into your local CVS repository, you will set up a working CVS checkout of OpenACS. When you want to update your site, you'll update the working CVS checkout, import those changes into your local CVS checkout, create a temporary CVS checkout to merge your local changes, fix any conflicts, commit your changes, and then update your site. It sounds complicated, but it's not too bad, and it is the best way to work around CVS's limitations.
This part describes how to set up your working CVS checkout. Once it is set up, you'll be able to update any packages using the existing working CVS checkout. We use one dedicated directory for each branch of OpenACS - if you are using OpenACS 5.1,x, you will need a 5.1 checkout. That will be good for 5.1, 5.11, 5.12, and so on. But when you want to upgrade to OpenACS 5.2, you'll need to check out another branch.
The openacs-5-1-compat tag identifies the latest released version of OpenACS 5.1 (ie, 5.1.3 or 5.1.4) and the latest compatible version of each package. Each minor release of OpenACS since 5.0 has this tagging structure. For example, OpenACS 5.1.x has
openacs-5-1-compat.You will want to separately check out all the packages you are using.
[root root]#
su - $OPENACS_SERVICE_NAME[$OPENACS_SERVICE_NAME aolserver]$cd /var/lib/aolserver[$OPENACS_SERVICE_NAME aolserver]$cvs -d :pserver:anonymous@cvs.openacs.org:/cvsroot checkout -r openacs-5-1-compat acs-core[$OPENACS_SERVICE_NAME aolserver]$cd openacs-4/packages[$OPENACS_SERVICE_NAME aolserver]$cvs -d :pserver:anonymous@cvs.openacs.org:/cvsroot checkout -r openacs-5-1-compatpackagename packagename2...[$OPENACS_SERVICE_NAME aolserver]$cd ../..[$OPENACS_SERVICE_NAME aolserver]$mv openacs-4 openacs-5-1Make sure your working CVS checkout doesn't have the entire CVS tree from OpenACS. A good way to check this is if it has a contrib directory. If it does, you probably checked out the entire tree. You might want to start over, remove your working CVS checkout, and try again.
-
Step 1: Import new OpenACS code.
-
Update CVS.Update your local CVS working checkout (unless you just set it up).
[root root]#
su - $OPENACS_SERVICE_NAME[$OPENACS_SERVICE_NAME aolserver]$cd /var/lib/aolserver/openacs-5-1[$OPENACS_SERVICE_NAME aolserver]$cvs up -Pd ChangeLog *.txt bin etc tcl www packages/* -
Update a single package via cvs working checkout.You can add or upgrade a single package at a time, if you already have a cvs working directory.
[root root]#
su - $OPENACS_SERVICE_NAME[$OPENACS_SERVICE_NAME aolserver]$cd /var/lib/aolserver/packages/openacs-5-1[$OPENACS_SERVICE_NAME openacs-5-1]$cvs up -Pd packagenameIn the next section, the import must be tailored to just this package.
-
-
Step 2: Merge New OpenACS code.Now that you have a local copy of the new OpenACS code, you need to import it into your local CVS repository and resolve any conflicts that occur.
Import the new files into your cvs repository; where they match existing files, they will become the new version of the file.
[$OPENACS_SERVICE_NAME openacs-5-1]$
cd /var/lib/aolserver/openacs-5-1[$OPENACS_SERVICE_NAME openacs-5-1]$cvs -d /var/lib/cvs import -m "upgrade to OpenACS 5.1" $OPENACS_SERVICE_NAME OpenACS openacs-5-1Tip
If adding or upgrading a single package, run the cvs import from within the base directory of that package, and adjust the cvs command accordingly. In this example, we are adding the
myfirstpackagepackage.[root root]#
su - $OPENACS_SERVICE_NAME[$OPENACS_SERVICE_NAME aolserver]$cd /var/lib/aolserver/openacs-5-0/package/myfirstpackage[$OPENACS_SERVICE_NAME myfirstpackage]$cvs -d /var/lib/cvs/ import -m "importing package" $OPENACS_SERVICE_NAME/packages/myfirstpackage OpenACS openacs-5-1Create a new directory as temporary working space to reconcile conflicts between the new files and your current work. The example uses the cvs keyword yesterday, making the assumption that you haven't checked in new code to your local tree in the last day. This section should be improved to use tags instead of the keyword yesterday!
[$OPENACS_SERVICE_NAME openacs-5.1]$
cd /var/lib/aolserver[$OPENACS_SERVICE_NAME tmp]$rm -rf $OPENACS_SERVICE_NAME-upgrade[$OPENACS_SERVICE_NAME tmp]$mkdir $OPENACS_SERVICE_NAME-upgrade[$OPENACS_SERVICE_NAME tmp]$cvs checkout -d $OPENACS_SERVICE_NAME-upgrade -jOpenACS:yesterday -jOpenACS -kk $OPENACS_SERVICE_NAME > cvs.txt 2>&1(CVS feedback here)The file /var/tmp/openacs-upgrade/cvs.txt contains the results of the upgrade. If you changed files that are part of the OpenACS tarball and those changes conflict, you'll have to manually reconcile them. Use the emacs command
M-x sort-lines(you may have to click Ctrl-space at the beginning of the file, and go to the end, and then try M-x sort-lines) and then, for each line that starts with a C, open that file and manually resolve the conflict by deleting the excess lines. When you're finished, or if there aren't any conflicts, save and exit.Once you've fixed any conflicts, commit the new code to your local tree.
[$OPENACS_SERVICE_NAME tmp]$
cd $OPENACS_SERVICE_NAME-upgrade[$OPENACS_SERVICE_NAME $OPENACS_SERVICE_NAME-upgrade]$cvs commit -m "Upgraded to 5.1" -
Step 3: Upgrade your local staging site.Update your working tree with the new files. The CVS flags ensure that new directories are created and pruned directories destroyed.
[$OPENACS_SERVICE_NAME $OPENACS_SERVICE_NAME-upgrade]$
cd /var/lib/aolserver/$OPENACS_SERVICE_NAME[$OPENACS_SERVICE_NAME $OPENACS_SERVICE_NAME]$cvs up -Pd(CVS feedback) [$OPENACS_SERVICE_NAME $OPENACS_SERVICE_NAME]$exit[root root]#
-
Upgrading files for a site using the OpenACS CVS repository (cvs.openacs.org)
-
[$OPENACS_SERVICE_NAME ~]$
cd /var/lib/aolserver/$OPENACS_SERVICE_NAME[$OPENACS_SERVICE_NAME $OPENACS_SERVICE_NAME]$cvs up -Pd(CVS feedback) [$OPENACS_SERVICE_NAME $OPENACS_SERVICE_NAME]$
If you are upgrading a production OpenACS site which is on a private CVS tree, this process lets you do the upgrade without risking extended downtime or an unusable site:
-
Declare a freeze on new cvs updates - ie, you cannot run cvs update on the production site
-
Make a manual backup of the production site in addition to the automated backups
-
Import the new code (for example, OpenACS 5.0.4, openacs-5-0-compat versions of ETP, blogger, and other applications) into a "vendor branch" of the $OPENACS_SERVICE_NAME CVS tree, as described in "Upgrading a local CVS repository", step 1, above. As soon as we do this, any cvs update command on production might bring new code onto the production site, which would be bad.
Do step 2 above (merging conflicts in a $OPENACS_SERVICE_NAME-upgrade working tree).
-
Manually resolve any conflicts in the working upgrade tree
-
Use the upgrade script and a recent backup of the production database, to ake a new upgraded database called $OPENACS_SERVICE_NAME-upgrade. Now we have a new website called $OPENACS_SERVICE_NAME-upgrade.
-
Test the $OPENACS_SERVICE_NAME-upgrade site
-
If $OPENACS_SERVICE_NAME-upgrade is fully functional, do the real upgrade.
-
Take down the $OPENACS_SERVICE_NAME site and put up a "down for maintenance" page.
-
Repeat the upgrade with the most recent database
-
Test the that the new site is functional. If so, change the upgraded site to respond to yourserver.net requests. If not, bring the original production site back up and return to the merge.
-