0.00%
Search · Index

Weblog Page

Showing 141 - 150 of 230 Postings (summary)

System/Application Requirements Template

Created by Gustaf Neumann, last modified by Gustaf Neumann 17 Feb 2008, at 07:08 AM

By You

OpenACS docs are written by the named authors, and may be edited by OpenACS documentation staff.

Briefly explain to the reader what this document is for, whether it records the requirements for a new system, a client application, a toolkit subsystem, etc. Remember your audience: fellow programmers, AND interested non-technical parties such as potential clients, who may all want to see how rigorous our engineering process is. Here and everywhere, write clearly and precisely; for requirements documentation, write at a level that any intelligent layperson can understand.

Very broadly, describe how the system meets a need of a business, group, the OpenACS as a whole, etc. Make sure that technical and non-technical readers alike would understand what the system would do and why it's useful. Whenever applicable, you should explicitly state what the business value of the system is.

Discuss the high-level breakdown of the components that make up the system. You can go by functional areas, by the main transactions the system allows, etc.

You should also state the context and dependencies of the system here, e.g. if it's an application-level package for OpenACS 4, briefly describe how it uses kernel services, like permissions or subsites.

Determine the types or classes of users who would use the system, and what their experience would be like at a high-level. Sketch what their experience would be like and what actions they would take, and how the system would support them.

Describe other systems or services that are comparable to what you're building. If applicable, say why your implementation will be superior, where it will match the competition, and where/why it will lack existing best-of-breed capabilities. This section is also in the Design doc, so write about it where you deem most appropriate.

Include all pertinent links to supporting and related material, such as:

  • System/Package "coversheet" - where all documentation for this software is linked off of

  • Design document

  • Developer's guide

  • User's guide

  • Other-cool-system-related-to-this-one document

  • Test plan

  • Competitive system(s)

The main course of the document, requirements. Break up the requirements sections (A, B, C, etc.) as needed. Within each section, create a list denominated with unique identifiers that reflect any functional hierarchy present, e.g. 20.5.13. - for the first number, leave generous gaps on the first writing of requirements (e.g. 1, 10, 20, 30, 40, etc.) because you'll want to leave room for any missing key requirements that may arise.

  • 10.0 A Common Solution

    Programmers and designers should only have to learn a single system that serves as a UI substrate for all the functionally specific modules in the toolkit.

    10.0.1

    The system should not make any assumptions about how pages should look or function.

    10.0.5

    Publishers should be able to change the default presentation of any module using a single methodology with minimal exposure to code.

For guidelines writing requirements, take a look at the quality standards, along with a good example, such as Package Manager Requirements.

Besides writing requirements in natural language, consider using the following techniques as needed:

  • Pseudocode - a quasi programming language, combining the informality of natural language with the strict syntax and control structures of a programming language.

  • Finite State Machines - a hypothetical machine that can be in only one of a given number of states at any specific time. Useful to model situations that are rigidly deterministic, that is, any set of inputs mathematically determines the system outputs.

  • Decision Trees and Decision Tables - similar to FSMs, but better suited to handle combinations of inputs.

  • Flowcharts - easy to draw and understand, suited for event and decision driven systems. UML is the industry standard here.

  • Entity-Relationship diagrams - a necessary part of Design documents, sometimes a high-level ER diagram is useful for requirements as well.

Although in theory coding comes after design, which comes after requirements, we do not, and perhaps should not, always follow such a rigid process (a.k.a. the waterfall lifecyle). Often, there is a pre-existing system or prototype first, and thus you may want to write some thoughts on implementation, for aiding and guiding yourself or other programmers.

Document Revision # Action Taken, Notes When? By Whom?
0.3 Edited further, incorporated feedback from Michael Yoon 9/05/2000 Kai Wu
0.2 Edited 8/22/2000 Kai Wu
0.1 Created 8/21/2000 Josh Finkler, Audrey McLoghlin

Staged Deployment for Production Networks

Created by Gustaf Neumann, last modified by Gustaf Neumann 17 Feb 2008, at 07:08 AM

By Joel Aufrecht

OpenACS docs are written by the named authors, and may be edited by OpenACS documentation staff.

This section describes two minimal-risk methods for deploying changes on a production network. The important characteristics of a safe change deployment include: (THIS SECTION IN DEVELOPMENT)

  • Control: You know for sure that the change you are making is the change that you intend to make and is the change that you tested.

  • Rollback: If anything goes wrong, you can return to the previous working configuration safely and quickly.

With this method, we control the files on a site via CVS. This example uses one developmental server (service0-dev) and one production server (service0). Depending on your needs, you can also have a staging server for extensive testing before you go live. The only way files should move between the server instances is via cvs.

To set up a developmental installation, first set up either your developmental installation or your production installation, and follow the instructions for committing your files to CVS. We'll assume in this example that you set up the production server (service0). To set up the developmental instance, you then follow the intall guide again, this time creating a new user (service0-dev) that you'll use for the new installation. To get the files for service0-dev, you check them out from cvs (check out service0).

su - service0-dev
co -d /cvsroot service0
mv service0 /var/lib/aolserver/service0-dev
ln -s /home/service0-dev/web /var/lib/aolserver/service0-dev
emacs web/etc/config.tcl
emacs web/etc/daemontools/run

In the config.tcl file, you'll probably want to pay attention the rollout support section. That will ensure that email on your developmental server will not be sent out to the general world.

Also, instead of going through the OpenACS online installer, you'll actually load live data into your production server.

You can even automate the process of getting live data from your production server. Copy something like this to /home/service0-dev/bin and put it in service0-dev's crontab to run once a night. You'll need to make sure the database backups are set up in service0's crontab, and that if the servers are on different physical machines, that the database backup is copied to the developmental machine once per night.

/usr/local/bin/svc -d /service/service0-dev
/bin/sleep 60
# this deletes the dev database!
/usr/local/pgsql/bin/dropdb service0-dev
/usr/local/pgsql/bin/createdb -E UNICODE service0-dev
# this is not necessary from Postgres 7.4 on
/usr/local/pgsql/bin/psql -f /var/lib/aolserver/service0-dev/packages/acs-kernel/sql/postgresql/postgresql.sql service0
mv /var/lib/aolserver/service0/database-backup/service0-nightly-backup.dmp.gz /var/lib/aolserver/service0-dev/database-backup/service0-nightly-backup-old.dmp.gz
/bin/gunzip /var/lib/aolserver/service0-dev/database-backup/service0-nightly-backup.dmp.gz
/usr/bin/perl -pi -e "s/^\\connect service0$/\\connect service0-dev/" /var/lib/aolserver/service0-dev/database-backup/service0-nightly-backup.dmp
/usr/local/pgsql/bin/psql service0-dev < /var/lib/aolserver/service0-dev/database-backup/service0-nightly-backup.dmp
/usr/local/bin/svc -u /service/service0-dev
/bin/gzip /var/lib/aolserver/service0-dev/database-backup/service0-nightly-backup-old.dmp

Your developmental server will always have data about a day old.

To make changes on service0-dev:

1) change the file on service0-dev as desired
2) test the new file
3) commit the file:
if the file is /var/lib/aolserver/service0-dev/www/index.adp, do:

cd /var/lib/aolserver/service0-dev/www
cvs diff index.adp (this is optional; it's just a
reality check)
the lines starting > will be added and the lines
starting < will be removed, when you commit
if that looks okay, commit with:
cvs -m "changing text on front page for February conference" index.adp
the stuff in -m "service0" is a comment visible only from within cvs commands

To make these changes take place on service0:

4) update the file on production:
cd /var/lib/aolserver/service0/www
cvs up -Pd index.adp

If you make changes that require changes to the database, test them out first on service0-dev, using either -create.sql or upgrade scripts. Once you've tested them, you then update and run the upgrade scripts from the package manager.

The production site can run "HEAD" from cvs.

The drawback to using HEAD as the live code is that you cannot commit new work on the development server without erasing the definition of 'working production code.' So a better method is to use a tag. This guarantees that, at any time in the future, you can retrieve exactly the same set of code. This is useful for both of the characteristics of safe change deployment. For control, you can use tags to define a body of code, test that code, and then know that what you are deploying is exactly that code. For rollback, you can use return to the last working tag if the new tag (or new, untagged changes) cause problems. .... example of using tags to follow ...

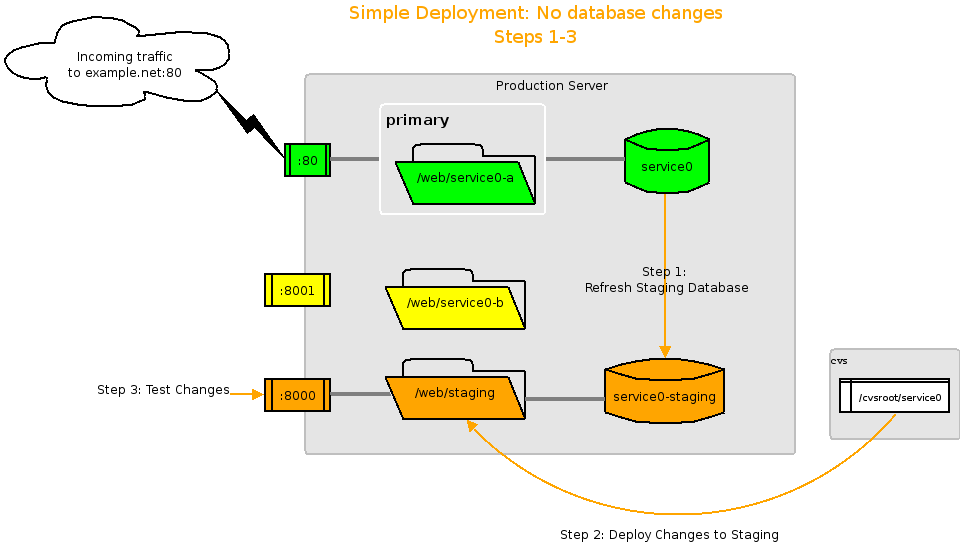
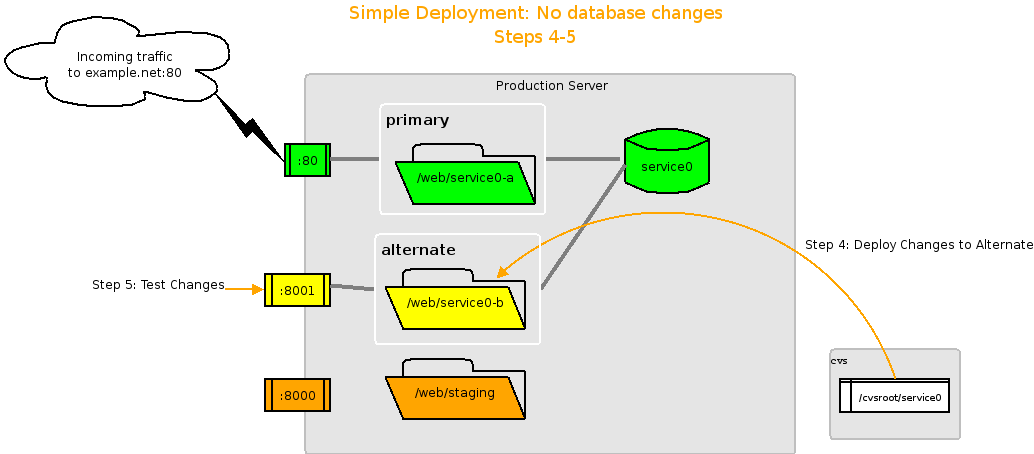
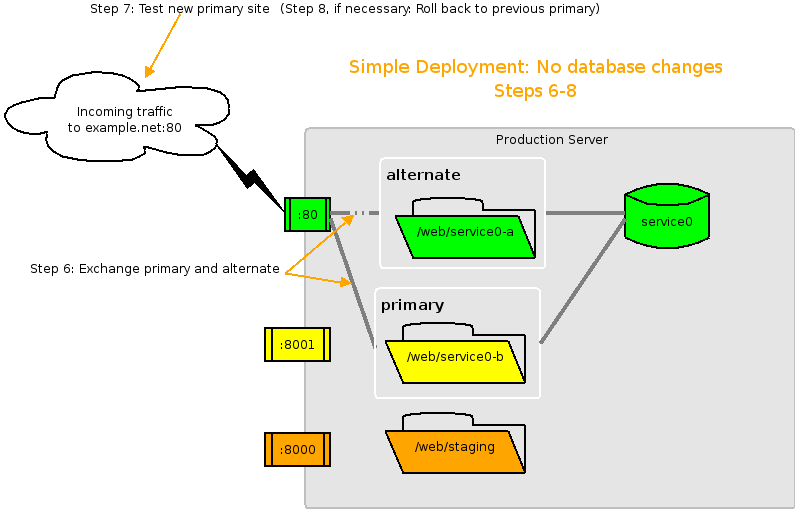
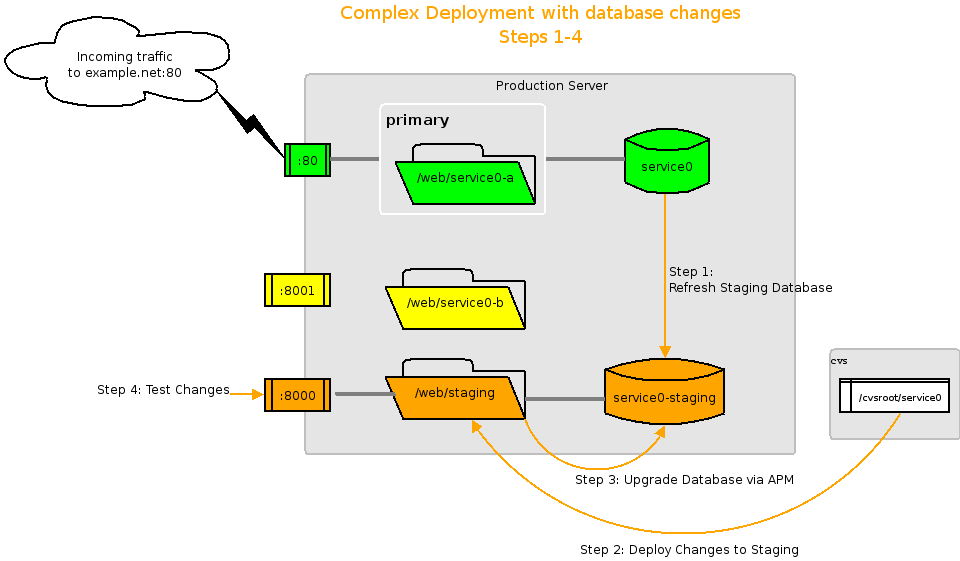
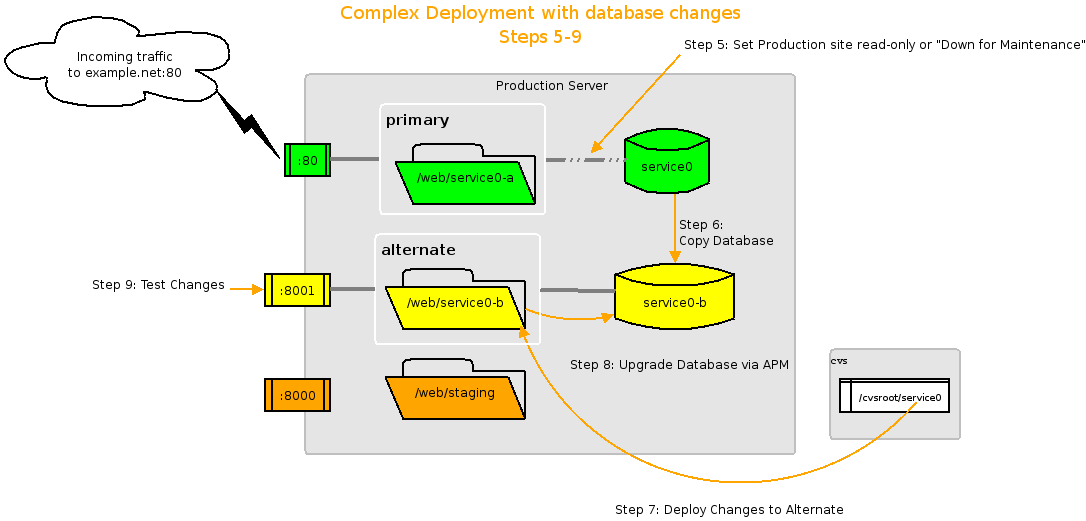
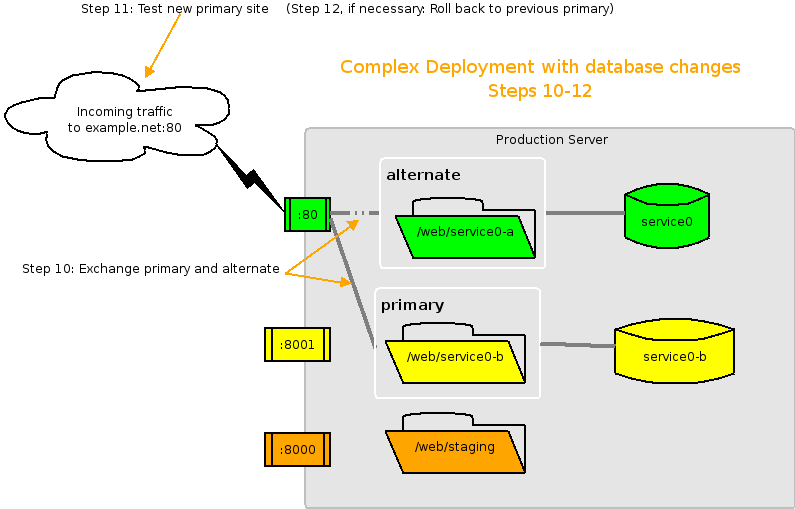
The approach taken in this section is to always create a new service with the desired changes, running in parallel with the existing site. This guarantees control, at least at the final step of the process: you know what changes you are about to make because you can see them directly. It does not, by itself, guarantee the entire control chain. You need additional measures to make sure that the change you are making is exactly and completely the change you intended to make and tested previously, and nothing more. Those additional measures typically take the form of source control tags and system version numbers. The parallel-server approach also guarantees rollback because the original working service is not touched; it is merely set aside.

This approach can has limitations. If the database or file system regularly receiving new data, you must interrupt this function or risk losing data in the shuffle. It also requires extra steps if the database will be affected.

Figure6.2.Simple A/B Deployment - Step 1

Simple A/B Deployment - Step 1

Figure6.3.Simple A/B Deployment - Step 2

Simple A/B Deployment - Step 2

Figure6.4.Simple A/B Deployment - Step 3

Simple A/B Deployment - Step 3

Figure6.5.Complex A/B Deployment - Step 1

Complex A/B Deployment - Step 1

Figure6.6.Complex A/B Deployment - Step 2

Complex A/B Deployment - Step 2

Figure6.7.Complex A/B Deployment - Step 3

Complex A/B Deployment - Step 3

Install nsopenssl

Created by Gustaf Neumann, last modified by Gustaf Neumann 17 Feb 2008, at 07:08 AM

By Joel Aufrecht and Malte Sussdorff

OpenACS docs are written by the named authors, and may be edited by OpenACS documentation staff.

This AOLserver module is required if you want people to connect to your site via https. These commands compile nsopenssl and install it, along with a tcl helper script to handle https connections. You will also need ssl certificates. Because those should be different for each server service, you won't need those instructions until later.

You will need the unpacked Aolserver tarball in /usr/local/src/aolserver and the nsopenssl tarball in /tmp.

Red Hat 9 note: see this thread for details on compiling nsopenssl.)

[root bin]# cd /usr/local/src/aolserver
[root aolserver]# wget --passive http://www.scottg.net/download/nsopenssl-2.1.tar.gz
[root aolserver]# tar xzf nsopenssl-2.1.tar.gz 
[root aolserver]# cd nsopenssl-2.1
[root nsopenssl-2.1]# make OPENSSL=/usr/local/ssl
gcc -I/usr/local/ssl/include -I../aolserver/include -D_REENTRANT=1 -DNDEBUG=1 -g -fPIC -Wall -Wno-unused -mcpu=i686 -DHAVE_CMMSG=1 -DUSE_FIONREAD=1 -DHAVE_COND_EINTR=1   -c -o nsopenssl.o nsopenssl.c
(many lines omitted)
gcc -shared -nostartfiles -o nsopenssl.so nsopenssl.o config.o init.o ssl.o thread.o tclcmds.o -L/usr/local/ssl/lib -lssl -lcrypto
[root nsopenssl-2.1]# cp nsopenssl.so /usr/local/aolserver/bin
[root nsopenssl-2.1]# cp https.tcl /usr/local/aolserver/modules/tcl/
[root nsopenssl-2.1]#
cd /usr/local/src/aolserver
wget --passive http://www.scottg.net/download/nsopenssl-2.1.tar.gz
tar xzf nsopenssl-2.1.tar.gz
cd nsopenssl-2.1
make OPENSSL=/usr/local/ssl
cp nsopenssl.so /usr/local/aolserver/bin
cp https.tcl /usr/local/aolserver/modules/tcl/

For Debian (more information):

apt-get install libssl-dev
cd /usr/local/src/aolserver
tar xzf /tmp/nsopenssl-2.1.tar.gz
cd nsopenssl-2.1
make OPENSSL=/usr/lib/ssl
cp nsopenssl.so /usr/local/aolserver/bin
cp https.tcl /usr/local/aolserver/modules/tcl/

You will need the AOLserver4 source in /usr/local/src/aolserver/aolserver and OpenSSL installed in /usr/local/ssl (or at least symlinked there). The use of INST=/point/to/aolserver is being replaced with AOLSERVER=/point/to/aolserver. We are including both here, because while this module still requires INST, if one just uses AOLSERVER, the default value would be used and could intefere with another existing installation.

FreeBSD note: build nsopenssl with gmake install OPENSSL=/usr/local/openssl AOLSERVER=/usr/local/aolserver4r10

[root bin]# cd /usr/local/src/aolserver
[root aolserver]# cvs -d:pserver:anonymous@cvs.sourceforge.net:/cvsroot/aolserver login
[root aolserver]# cvs -d:pserver:anonymous@cvs.sourceforge.net:/cvsroot/aolserver co nsopenssl
[root aolserver]# cd nsopenssl
[root nsopenssl]# make OPENSSL=/usr/local/ssl
gcc -I/usr/local/ssl/include (many items omitted)  -c -o sslcontext.o sslcontext.c
(many lines omitted)
[root nsopenssl-2.1]# make install OPENSSL=/usr/local/ssl AOLSERVER=/usr/local/aolserver4r10 INST=/usr/local/aolserver4r10
[root nsopenssl-2.1]#
cd /usr/local/src/aolserver
cvs -d:pserver:anonymous@cvs.sourceforge.net:/cvsroot/aolserver login
cvs -d:pserver:anonymous@cvs.sourceforge.net:/cvsroot/aolserver co nsopenssl
cd nsopenssl
make OPENSSL=/usr/local/ssl
make install OPENSSL=/usr/local/ssl AOLSERVER=/usr/local/aolserver AOLSERVER=/usr/local/aolserver4r10

If you have problems starting your server with nsopenssl.so due to missing libssl.so.0.9.7 (or lower), you have to create symlinks

[root nsopenssl]# cd /usr/local/aolserver/lib
[root lib]# ln -s /usr/local/ssl/lib/libssl.so.0.9.7 libssl.so.0.9.7
[root lib]# ln -s /usr/local/ssl/lib/libcrypto.so.0.9.7 libcrypto.so.0.9.7
[root lib]#
cd /usr/local/aolserver/lib
ln -s /usr/local/ssl/lib/libssl.so.0.9.7 libssl.so.0.9.7
ln -s /usr/local/ssl/lib/libcrypto.so.0.9.7 libcrypto.so.0.9.7

SSL support must be enabled seperately in each OpenACS server (Generate ssl certificates.

If your ports for SSL are privileged (below 1024), you will have to start AOLserver with prebinds for both your HTTP and your HTTPS port (usually by adding -b your_ip:your_http_port,your_ip:your_https_port to the nsd call. If you are using daemontools, this can be changed in your etc/daemontools/run file).

To enable SSL support in your server, make sure your etc/config.tcl file has a section on "OpenSSL 3 with AOLserver4". If that section is not present, try looking at the README file in /usr/local/src/aolserver/nsopenssl.

Writing upgrade scripts

Created by Gustaf Neumann, last modified by Gustaf Neumann 17 Feb 2008, at 07:08 AM

by Jade Rubick

OpenACS docs are written by the named authors, and may be edited by OpenACS documentation staff.

If your package changes its data model, you have to write an upgrade script. This is very easy in OpenACS.

First, you want to make sure you change the original .sql file so that new installation will have the new data model.

Next, check what version your package is currently at. For example, it may be at version 1.0b1. Create a file in sql/postgres/upgrade called packagename-1.0b1-1.0b2.sql and put the SQL code that will update the data model. For example, if you add in a column, you would have an alter table add column statement in this file. Test this out very well, because data model changes are more serious and fundamental changes than the program .tcl files.

Now use the APM to create a new package version 1.0b2. Commit all your changes, tag the release (the section called “Distributing upgrades of your package”), and both new installations and upgrades will be taken care of.

Using PSGML mode in Emacs

Created by Gustaf Neumann, last modified by Gustaf Neumann 17 Feb 2008, at 07:08 AM

By David Lutterkort

OpenACS docs are written by the named authors, and may be edited by OpenACS documentation staff.

Note: nxml mode replaces and/or complements psgml mode. More information.

PSGML Mode is a mode for editing, umm, SGML and XML documents in emacs. It can parse a DTD and help you insert the right tags in the right place, knows about tags' attributes and can tell you in which contexts a tag can be used. If you give it the right DTD, that is. But even without a DTD, it can save you some typing since pressing C-c/ will close an open tag automatically.

Most newer emacsen come with PSGML mode preinstalled. You can find out whether your emacs has it with the locate-library command. In Emacs, type M-x locate-library and enter psgml. Emacs will tell you if it found it or not.

If you don't have PSGML preinstalled in your Emacs, there are two things you can do:

  1. On Linux: Get the psgml rpm from RedHat's docbook-tools and install it as usual.

  2. On other systems: Get the tarball from the PSGML Website. Unpack it and follow the install instructions.

The easiest way to teach PSGML mode about a DTD is by adding it to your own CATALOG. Here is an example of how you can set that up for the Docbook XML DTD.

  1. Get the Docbook XML DTD zip archive from docbook.org

  2. Go somewhere in your working directory and do

          mkdir -p dtd/docbook-xml
          cd dtd/docbook-xml
          unzip -a <docbook XML DTD zip archive>
    
    
  3. Create a file with the name CATALOG in the dtd directory and put the line

          CATALOG "docbook-xml/docbook.cat"
    

    in it. By maintaining your own CATALOG, it is easy to add more DTD's without changing your emacs settings. (How about that HTML 4.01 DTD you always wanted to get from W3C ? The DTD is in the zip archives and tarballs available on the site.)

That's it. Now you are ready to tell emacs all about PSGML mode and that funky CATALOG

If you installed PSGML mode in a non-standard location, e.g., somewhere in your home directory, you need to add this to the load-path by adding this line to your .emacs file:

      (add-to-list 'load-path "/some/dir/that/contains/psgml.elc")

To let PSGML mode find your CATALOG and to enable PSGML mode for all your editing, add these lines to your .emacs:

      (require 'psgml)

      (add-to-list 'auto-mode-alist '("\\.html" . sgml-mode))
      (add-to-list 'auto-mode-alist '("\\.adp" . xml-mode))
      (add-to-list 'auto-mode-alist '("\\.xml" . xml-mode))
      (add-to-list 'auto-mode-alist '("\\.xsl" . xml-mode))

      (add-to-list 'sgml-catalog-files "/path/to/your/dtd/CATALOG")

If you want font-locking and indentation, you can also add these lines into the .emacs file:

      (setq sgml-markup-faces '((start-tag . font-lock-function-name-face)
                                (end-tag . font-lock-function-name-face)
                (comment . font-lock-comment-face)
                (pi . bold)
                (sgml . bold)
                (doctype . bold)
                (entity . font-lock-type-face)
                (shortref . font-lock-function-name-face)))
      (setq sgml-set-face t)
      (setq-default sgml-indent-data t)
      ;; Some convenient key definitions:
      (define-key sgml-mode-map "\C-c\C-x\C-e" 'sgml-describe-element-type)
      (define-key sgml-mode-map "\C-c\C-x\C-i" 'sgml-general-dtd-info)
      (define-key sgml-mode-map "\C-c\C-x\C-t" 'sgml-describe-entity)

All SGML and XML documents that should conform to a DTD have to declare a doctype. For the docbook XML, all your .xml files whould start with the line

      <!DOCTYPE book PUBLIC "-//OASIS//DTD DocBook XML V4.4//EN" "docbookx.dtd">

If your document is only part of a larger XML document, you can tell PSGML mode about it by appending the following lines to your file. In this case, do not include a DOCTYPE declaration in your file.

      <!--
       Local Variables:
       sgml-parent-document: ("top.xml" "book" "sect1")
       End:
      -->

Which says that the parent of this document can be found in the file top.xml, that the element in the parent that will enclose the current document is a book and that the current file's topmost element is a sect1.

Of course, you should read the emacs texinfo pages that come with PSGML mode from start to finish. Barring that, here are some handy commands:

Key Command
C-c C-e Insert an element. Uses completion and only lets you insert elements that are valid
C-c C-a Edit attributes of enclosing element.
C-c C-x C-i Show information about the document's DTD.
C-c C-x C-e Describe element. Shows for one element which elements can be parents, what its contents can be and lists its attributes.

Install qmail (OPTIONAL)

Created by Gustaf Neumann, last modified by Gustaf Neumann 17 Feb 2008, at 07:08 AM

Qmail is a Mail Transfer Agent. It handles incoming and outgoing mail. Install qmail if you want your OpenACS server to send and receive mail, and you don't want to use an alternate MTA.

Red Hat 9: all djb tools (qmail, daemontools, ucspi) will fail to compile in Red Hat 9 because of changes to glibc (patches)

  1. Install ucspi.This program handles incoming tcp connections. Download ucspi and install it.

    [root root]# cd /usr/local/src
    [root src]# wget http://cr.yp.to/ucspi-tcp/ucspi-tcp-0.88.tar.gz
    [root src]# tar xzf ucspi-tcp-0.88.tar.gzcd /usr/local/src
    wget http://cr.yp.to/ucspi-tcp/ucspi-tcp-0.88.tar.gz
    tar xzf ucspi-tcp-0.88.tar.gz 
    

    Red Hat 9 only

    wget http://moni.csi.hu/pub/glibc-2.3.1/ucspi-tcp-0.88.errno.patch
    cd ucspi-tcp-0.88
    patch -p1 <../ucspi-tcp-0.88.errno.patch
    cd ..

    All platforms continue:

    [root src]# cd ucspi-tcp-0.88
    [root ucspi-tcp-0.88]# make
    ( cat warn-auto.sh;  echo 'main="$1"; shift'; \(many lines omitted)
    ./compile instcheck.c
    ./load instcheck hier.o auto_home.o unix.a byte.a
    [root ucspi-tcp-0.88]# make setup check
    ./install
    ./instcheck
    [root ucspi-tcp-0.88]#
    
    cd ucspi-tcp-0.88
    make
    make setup check
    

    Verify that ucspi-tcp was installed successfully by running the tcpserver program which is part of ucspi-tcp:

    [root ucspi-tcp-0.88]# tcpserver
    tcpserver: usage: tcpserver [ -1UXpPhHrRoOdDqQv ] [ -c limit ] [ -x rules.cdb ] [ -B banner ] [ -g gid ] [ -u uid
    ] [ -b backlog ] [ -l localname ] [ -t timeout ] host port program
    [root ucspi-tcp-0.88]#
    

    (I'm not sure if this next step is 100% necessary, but when I skip it I get problems. If you get the error 553 sorry, that domain isn't in my list of allowed rcpthosts (#5.7.1) then you need to do this.) AOLserver sends outgoing mail via the ns_sendmail command, which pipes a command to the sendmail executable. Or, in our case, the qmail replacement wrapper for the sendmail executable. In some cases, though, the outgoing mail requset is apparently sent through tcp/ip, so that it comes to qmail from 127.0.0.1 (a special IP address that means the local machine - the "loopback" interface). Unless this mail is addressed to the same machine, qmail thinks that it's an attempt to relay mail, and rejects it. So these two commands set up an exception so that any mail sent from 127.0.0.1 is allowed to send outgoing mail.

    [root ucspi-tcp-0.88]# cp /tmp/openacs-5.2.3rc1/packages/acs-core-docs/www/files/tcp.smtp.txt /etc/tcp.smtp
    [root ucspi-tcp-0.88]# tcprules /etc/tcp.smtp.cdb /etc/tcp.smtp.tmp < /etc/tcp.smtpcp /tmp/openacs-5.2.3rc1/packages/acs-core-docs/www/files/tcp.smtp.txt /etc/tcp.smtp
    tcprules /etc/tcp.smtp.cdb /etc/tcp.smtp.tmp < /etc/tcp.smtp 
    
  2. Install Qmail.

    Download qmail, set up the standard supporting users and build the binaries:

    [root root]# cd /usr/local/src
    [root src]# wget http://www.qmail.org/netqmail-1.04.tar.gz
    [root src]# tar xzf netqmail-1.04.tar.gz
    --15:04:11--  http://www.qmail.org/netqmail-1.04.tar.gz
               => `netqmail-1.04.tar.gz'
    Resolving www.qmail.org... done.
    Connecting to www.qmail.org[192.203.178.37]:80... connected.
    HTTP request sent, awaiting response... 200 OK
    Length: 242,310 [application/x-gunzip]
    
    88% [===============================>     ] 214,620       22.93K/s ETA 00:01
    
    15:04:21 (24.04 KB/s) - `netqmail-1.04.tar.gz' saved [242310/242310]
    
    [root src]# mkdir /var/qmail
    [root src]# groupadd nofiles
    [root src]# useradd -g nofiles -d /var/qmail/alias alias
    [root src]# useradd -g nofiles -d /var/qmail qmaild
    [root src]# useradd -g nofiles -d /var/qmail qmaill
    [root src]# useradd -g nofiles -d /var/qmail qmailp
    [root src]# groupadd qmail
    [root src]# useradd -g qmail -d /var/qmail qmailq
    [root src]# useradd -g qmail -d /var/qmail qmailr
    [root src]# useradd -g qmail -d /var/qmail qmails
    [root src]# cd netqmail-1.04
    [root netqmail-1.04]# ./collate.sh
    
    You should see 7 lines of text below.  If you see anything
    else, then something might be wrong.
    [1] Extracting qmail-1.03...
    [2] Patching qmail-1.03 into netqmail-1.04.  Look for errors below:
         20
    [4] The previous line should say 20 if you used GNU patch.
    [5] Renaming qmail-1.03 to netqmail-1.04...
    [6] Continue installing qmail using the instructions found at:
    [7] http://www.lifewithqmail.org/lwq.html#installation
    [root netqmail-1.04]# cd netqmail-1.04
    [root netqmail-1.04]# make setup check
    ( cat warn-auto.sh;  echo CC=\'`head -1 conf-cc`\'; \(many lines omitted)
    ./install
    ./instcheck
    cd /usr/local/src
    wget http://www.qmail.org/netqmail-1.04.tar.gz
    tar xzf netqmail-1.04.tar.gz
    mkdir /var/qmail
    groupadd nofiles
    useradd -g nofiles -d /var/qmail/alias alias
    useradd -g nofiles -d /var/qmail qmaild
    useradd -g nofiles -d /var/qmail qmaill
    useradd -g nofiles -d /var/qmail qmailp
    groupadd qmail
    useradd -g qmail -d /var/qmail qmailq
    useradd -g qmail -d /var/qmail qmailr
    useradd -g qmail -d /var/qmail qmails
    cd netqmail-1.04
    ./collate.sh
    cd netqmail-1.04
    make setup check
    

    Replace sendmail with qmail's wrapper.

    [root qmail-1.03]# rm -f /usr/bin/sendmail /usr/sbin/sendmail
    [root qmail-1.03]# ln -s /var/qmail/bin/sendmail /usr/sbin/sendmail
    [root qmail-1.03]#
    rm -f /usr/bin/sendmail /usr/sbin/sendmail
    ln -s /var/qmail/bin/sendmail /usr/sbin/sendmail
    

    Configure qmail - specifically, run the config script to set up files in /var/qmail/control specifying the computer's identity and which addresses it should accept mail for. This command will automatically set up qmail correctly if you have correctly set a valid host nome. If not, you'll want to read /var/qmail/doc/INSTALL.ctl to find out how to configure qmail.

    [root qmail-1.03]# ./config-fast yourserver.test
    
    Your fully qualified host name is yourserver.test.
    Putting yourserver.test into control/me...
    Putting yourserver.test into control/defaultdomain...
    Putting yourserver.test into control/plusdomain...
    Putting yourserver.test into control/locals...
    Putting yourserver.test into control/rcpthosts...
    Now qmail will refuse to accept SMTP messages except to yourserver.test.
    Make sure to change rcpthosts if you add hosts to locals or virtualdomains!
    [root qmail-1.03]#
    ./config-fast yourserver.test


    All incoming mail that isn't for a specific user is handled by the alias user. This includes all root mail. These commands prepare the alias user to receive mail.

    [root qmail-1.03]# cd ~alias; touch .qmail-postmaster .qmail-mailer-daemon .qmail-root
    [root alias]# chmod 644 ~alias/.qmail*
    [root alias]# /var/qmail/bin/maildirmake ~alias/Maildir/
    [root alias]# chown -R alias.nofiles /var/qmail/alias/Maildir
    [root alias]#
    cd ~alias; touch .qmail-postmaster .qmail-mailer-daemon .qmail-root
    chmod 644 ~alias/.qmail*
    /var/qmail/bin/maildirmake ~alias/Maildir/
    chown -R alias.nofiles /var/qmail/alias/Maildir
    

    Configure qmail to use the Maildir delivery format (instead of mbox), and install a version of the qmail startup script modified to use Maildir.

    [root alias]# echo "./Maildir" > /var/qmail/bin/.qmail
    [root alias]# cp /tmp/openacs-5.2.3rc1/packages/acs-core-docs/www/files/qmail.rc.txt /var/qmail/rc
    [root alias]# chmod 755 /var/qmail/rc
    [root alias]#
    echo "./Maildir" > /var/qmail/bin/.qmail
    cp /tmp/openacs-5.2.3rc1/packages/acs-core-docs/www/files/qmail.rc.txt /var/qmail/rc
    chmod 755 /var/qmail/rc


    Set up the skeleton directory so that new users will be configured for qmail.

    [root root]# /var/qmail/bin/maildirmake /etc/skel/Maildir
    [root root]# echo "./Maildir/" > /etc/skel/.qmail
    [root root]#
    /var/qmail/bin/maildirmake /etc/skel/Maildir
    echo "./Maildir/" > /etc/skel/.qmail
    

    As recommended, we will run qmail with daemontools control files. Create daemontools control directories, set up a daemontools control script, copy the supervise control files, and set permissions. The last line links the control directories to /service, which will cause supervise to detect them and execute the run files, causing qmail to start.

    [root root]# mkdir -p /var/qmail/supervise/qmail-send/log
    [root root]# mkdir -p /var/qmail/supervise/qmail-smtpd/log
    [root root]# mkdir /var/log/qmail
    [root root]# chown qmaill /var/log/qmail
    [root root]# cp /tmp/openacs-5.2.3rc1/packages/acs-core-docs/www/files/qmailctl.txt /var/qmail/bin/qmailctl
    [root root]# chmod 755 /var/qmail/bin/qmailctl
    [root root]# ln -s /var/qmail/bin/qmailctl /usr/bin
    [root root]# cp /tmp/openacs-5.2.3rc1/packages/acs-core-docs/www/files/qmail-send-run.txt /var/qmail/supervise/qmail-send/run 
    [root root]# cp /tmp/openacs-5.2.3rc1/packages/acs-core-docs/www/files/qmail-send-log-run.txt /var/qmail/supervise/qmail-send/log/run
    [root root]# cp /tmp/openacs-5.2.3rc1/packages/acs-core-docs/www/files/qmail-smtpd-run.txt /var/qmail/supervise/qmail-smtpd/run
    [root root]# cp /tmp/openacs-5.2.3rc1/packages/acs-core-docs/www/files/qmail-smtpd-log-run.txt /var/qmail/supervise/qmail-smtpd/log/run
    [root root]# chmod 755 /var/qmail/supervise/qmail-send/run
    [root root]# chmod 755 /var/qmail/supervise/qmail-send/log/run
    [root root]# chmod 755 /var/qmail/supervise/qmail-smtpd/run
    [root root]# chmod 755 /var/qmail/supervise/qmail-smtpd/log/run
    [root root]# ln -s /var/qmail/supervise/qmail-send /var/qmail/supervise/qmail-smtpd /service
    [root root]# ln -s /var/qmail/supervise/qmail-send /var/qmail/supervise/qmail-smtpd /servicemkdir -p /var/qmail/supervise/qmail-send/log
    mkdir -p /var/qmail/supervise/qmail-smtpd/log
    mkdir /var/log/qmail
    chown qmaill /var/log/qmail
    cp /tmp/openacs-5.2.3rc1/packages/acs-core-docs/www/files/qmailctl.txt /var/qmail/bin/qmailctl
    chmod 755 /var/qmail/bin/qmailctl
    ln -s /var/qmail/bin/qmailctl /usr/bin
    cp /tmp/openacs-5.2.3rc1/packages/acs-core-docs/www/files/qmail-send-run.txt /var/qmail/supervise/qmail-send/run
    cp /tmp/openacs-5.2.3rc1/packages/acs-core-docs/www/files/qmail-send-log-run.txt /var/qmail/supervise/qmail-send/log/run
    cp /tmp/openacs-5.2.3rc1/packages/acs-core-docs/www/files/qmail-smtpd-run.txt /var/qmail/supervise/qmail-smtpd/run
    cp /tmp/openacs-5.2.3rc1/packages/acs-core-docs/www/files/qmail-smtpd-log-run.txt /var/qmail/supervise/qmail-smtpd/log/run
    chmod 755 /var/qmail/supervise/qmail-send/run
    chmod 755 /var/qmail/supervise/qmail-send/log/run
    chmod 755 /var/qmail/supervise/qmail-smtpd/run
    chmod 755 /var/qmail/supervise/qmail-smtpd/log/run
    ln -s /var/qmail/supervise/qmail-send /var/qmail/supervise/qmail-smtpd /service


    Wait ten seconds or so, and then verify that that the four qmail processes are running. If uptimes don't rise above 1 second, this may indicate broken scripts that are continuously restarting. In that case, start debugging by checking permissions.

    [root root]# qmailctl stat
    /service/qmail-send: up (pid 32700) 430 seconds
    /service/qmail-send/log: up (pid 32701) 430 seconds
    /service/qmail-smtpd: up (pid 32704) 430 seconds
    /service/qmail-smtpd/log: up (pid 32705) 430 seconds
    messages in queue: 0
    messages in queue but not yet preprocessed: 0
    [root root]#

    Further verify by sending and receiving email. Incoming mail for root is stored in /var/qmail/alias/Maildir.

Subsites Design Document

Created by Gustaf Neumann, last modified by Gustaf Neumann 17 Feb 2008, at 07:08 AM

By Rafael H. Schloming

OpenACS docs are written by the named authors, and may be edited by OpenACS documentation staff.

*Note* This document has not gone through the any of the required QA process yet. It is being tagged as stable due to high demand.

An OpenACS 4 subsite is a managed suite of applications that work together for a particular user community. This definition covers a very broad range of requirements: from a Geocities style homepage where a user can install whatever available application he wants (e.g. a single user could have their own news and forums), to a highly structured project subsite with multiple interdependent applications. Thus, flexibility in application deployment is the overarching philosophy of subsites.

Meeting such broad requirements of flexibility demands architecture-level support, i.e. very low level support from the core OpenACS 4 data model. For example, the subsites concept demands that any package can have multiple instances installed at different URLs - entailing support from the APM and the Request Processor. Since the design and implementation directly associated with subsites is actually minimal, a discussion of subsites design is, in fact, a discussion of how core OpenACS 4 components implicitly support subsites as a whole.

The subsites problem actually has several quite diverse origins. It was originally recognized as a toolkit feature in the form of "scoping". The basic concept behind scoping was to allow one scoped OpenACS installation to behave as multiple unscoped OpenACS installations so that one OpenACS install could serve multiple communities. Each piece of application data was tagged with a "scope" consisting of the (user_id, group_id, scope) triple. In practice the highly denormalized data models that this method uses produced large amounts of very redundant code and in general made it an extremely cumbersome process to "scopify" a module.

Before the advent of scoping there were several cases of client projects implementing their own version of scoping in special cases. One example being the wineaccess multi-retailer ecommerce. (Remember the other examples and get details. Archnet?, iluvcamp?)

The requirements of all these different projects vary greatly, but the one consistent theme among all of them is the concept that various areas of the web site have their own private version of a module. Because this theme is so dominant, this is the primary problem that the OpenACS4 implementation of subsites addresses.

...

The current implementation of package instances and subsites allows extremely flexible URL configurations. This has the benefit of allowing multiple instances of the same package to be installed in one subsite, but can potentially complicate the process of integrating packages with each other since it is likely people will want packages that live at non standard URLs to operate together. This requirement would cause some packages to have more configuration options than normal since hard-coding the URLs would not be feasible anymore.

This section will cover all the APIs relevant to subsites, and so will consist of portions of the APIs of several systems.

Packages

The following package is provided for instantiation of packages. The apm_package.new function can be used to create a package of any type known to the system. The apm_package_types table can be queried for a list of installed packages. (See APM docs for more detail XXX: insert link here)

create or replace package apm_package
as

  function new (
    package_id      in apm_packages.package_id%TYPE
               default null,
    instance_name   in apm_packages.instance_name%TYPE
               default null,
    package_key     in apm_packages.package_key%TYPE,
    object_type     in acs_objects.object_type%TYPE
               default 'apm_package',
    creation_date   in acs_objects.creation_date%TYPE
               default sysdate,
    creation_user   in acs_objects.creation_user%TYPE
               default null,
    creation_ip     in acs_objects.creation_ip%TYPE
               default null,
    context_id      in acs_objects.context_id%TYPE
               default null
  ) return apm_packages.package_id%TYPE;

  procedure delete (
    package_id      in apm_packages.package_id%TYPE
  );

  function singleton_p (
    package_key     in apm_packages.package_key%TYPE
  ) return integer;

  function num_instances (
    package_key     in apm_package_types.package_key%TYPE
  ) return integer;

  function name (
    package_id      in apm_packages.package_id%TYPE
  ) return varchar;

  -- Enable a package to be utilized by a subsite.
  procedure enable (
    package_id      in apm_packages.package_id%TYPE
  );

  procedure disable (
    package_id      in apm_packages.package_id%TYPE
  );

  function highest_version (
    package_key     in apm_package_types.package_key%TYPE
  ) return apm_package_versions.version_id%TYPE;

end apm_package;
/
show errors

Site Nodes

This data model keeps track of what packages are being served from what URLs. You can think of this as a kind of rp_register_directory_map on drugs. This table represents a fully hierarchical site map. The directory_p column indicates whether or not the node is a leaf node. The pattern_p column indicates whether an exact match between the request URL and the URL of the node is required. If pattern_p is true then a match between a request URL and a site node occurs if any valid prefix of the request URL matches the site node URL. The object_id column contains the object mounted on the URL represented by the node. In most cases this will be a package instance.

create table site_nodes (
    node_id     constraint site_nodes_node_id_fk
            references acs_objects (object_id)
            constraint site_nodes_node_id_pk
            primary key,
    parent_id   constraint site_nodes_parent_id_fk
            references site_nodes (node_id),
        name        varchar(100)
            constraint site_nodes_name_ck
            check (name not like '%/%'),
    constraint site_nodes_un
    unique (parent_id, name),
    -- Is it legal to create a child node?
    directory_p char(1) not null
            constraint site_nodes_directory_p_ck
            check (directory_p in ('t', 'f')),
        -- Should urls that are logical children of this node be
    -- mapped to this node?
        pattern_p   char(1) default 'f' not null
            constraint site_nodes_pattern_p_ck
            check (pattern_p in ('t', 'f')),
    object_id   constraint site_nodes_object_id_fk
            references acs_objects (object_id)
);

The following package is provided for creating nodes.

create or replace package site_node
as

  -- Create a new site node. If you set directory_p to be 'f' then you
  -- cannot create nodes that have this node as their parent.

  function new (
    node_id     in site_nodes.node_id%TYPE default null,
    parent_id       in site_nodes.node_id%TYPE default null,
    name        in site_nodes.name%TYPE,
    object_id       in site_nodes.object_id%TYPE default null,
    directory_p     in site_nodes.directory_p%TYPE,
    pattern_p       in site_nodes.pattern_p%TYPE default 'f'
  ) return site_nodes.node_id%TYPE;

  -- Delete a site node.

  procedure delete (
    node_id     in site_nodes.node_id%TYPE
  );

  -- Return the node_id of a url. If the url begins with '/' then the
  -- parent_id must be null. This will raise the no_data_found
  -- exception if there is no matching node in the site_nodes table.
  -- This will match directories even if no trailing slash is included
  -- in the url.

  function node_id (
    url         in varchar,
    parent_id   in site_nodes.node_id%TYPE default null
  ) return site_nodes.node_id%TYPE;

  -- Return the url of a node_id.

  function url (
    node_id     in site_nodes.node_id%TYPE
  ) return varchar;

end;
/
show errors

Request Processor

Once the above APIs are used to create packages and mount them on a specific site node, the following request processor APIs can be used to allow the package to serve content appropriate to the package instance.

[ad_conn node_id]
[ad_conn package_id]
[ad_conn package_url]

The subsites implementation doesn't really have it's own data model, although it depends heavily on the site-nodes data model, and the APM data model.

The primary elements of the subsite user interface consist of the subsite admin pages. These pages are divided up into two areas: Group administration, and the site map. The group administration pages allow a subsite administrator to create and modify groups. The site map pages allow a subsite administrator to install, remove, configure, and control access to packages. The site map interface is the primary point of entry for most of the things a subsite administrator would want to do.

...

The current subsites implementation addresses the most basic functionality required for subsites. It is likely that as developers begin to use the subsites system for more sophisticated projects, it will become necessary to develop tools to help build tightly integrated packages. The general area this falls under is "inter-package communication". An actual implementation of this could be anything from clever use of configuration parameters to lots of package level introspection. Another area that is currently underdeveloped is the ability to "tar up" and distribute a particular configuration of site nodes/packages. As we build more fundamental applications that can be applied in more general areas, this feature will become more and more in demand since more problems will be solvable by configuration instead of coding.

Kernel Documentation

Created by Gustaf Neumann, last modified by Gustaf Neumann 17 Feb 2008, at 07:08 AM

Additional Resources for CVS

Created by Gustaf Neumann, last modified by Gustaf Neumann 17 Feb 2008, at 07:08 AM

High Availability/High Performance Configurations

Created by Gustaf Neumann, last modified by Gustaf Neumann 17 Feb 2008, at 07:08 AM

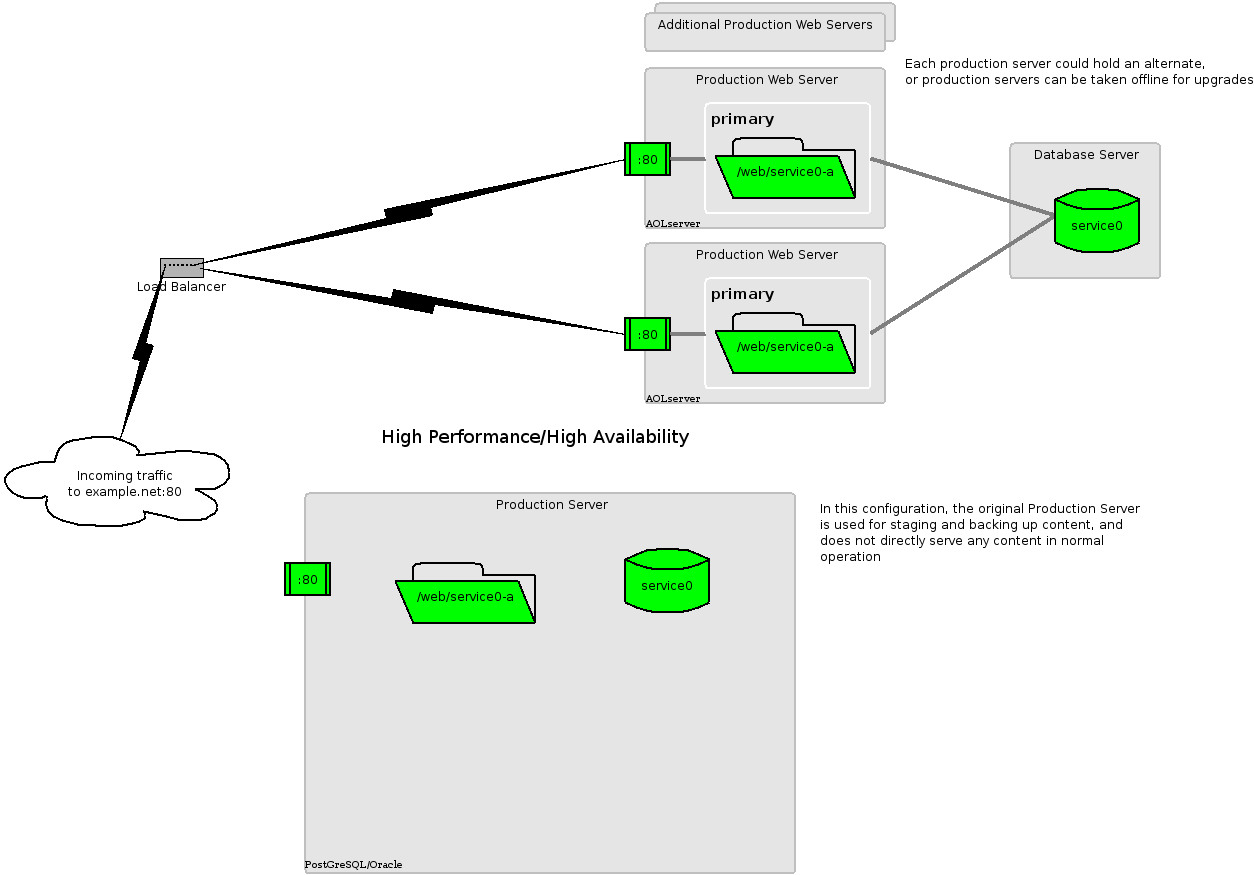
See also the section called “Running a PostgreSQL database on another server”.

Figure6.1.Multiple-server configuration

Multiple-server configuration

Next Page